Part 1: Java Database Connectivity (JDBC)
The Java Database Connectivity (JDBC) API provides a standard way for Java applications to interact with various database management systems (DBMS). It enables Java programs to execute SQL statements, retrieve results, and manage database connections.
JDBC acts as a bridge between Java applications and databases, allowing consistent database access regardless of the underlying database system.
Why JDBC?
- How to connect Java applications to databases?
- How to execute SQL queries and updates from Java?
- How to handle database results in Java?
- How to work with different database systems using the same code?
- How to protect against SQL injection attacks?
Overview of Databases and SQL
Relational Databases
A relational database organizes data into relations (tables)) with rows and columns. Each table represents an entity type, and each row represents a specific instance of that entity.
Key concepts:
- Tables (Relations): Tables are
- Rows (Records/Tuples)
- Columns (Fields/Attributes)
- Primary Keys
- Foreign Keys
- Relationships
Common SQL Data Types
| Category | Types | Description |
|---|---|---|
| Numeric | INT, DECIMAL, FLOAT | For storing numbers |
| String | VARCHAR, TEXT, CHAR | For storing text |
| Date/Time | DATE, TIME, TIMESTAMP | For storing dates and times |
| Boolean | BOOLEAN | For storing true/false values |
| Binary | BLOB, BINARY | For storing binary data |
Basic SQL Operations
Create Table
CREATE TABLE students (
    id INT PRIMARY KEY,
    name VARCHAR(100),
    gpa DECIMAL(3,2)
);
Insert Data
INSERT INTO students (id, name, gpa)
VALUES (1, 'Ahmed Ali', 3.75);
Select Data
SELECT * FROM students WHERE gpa >= 3.5;
Update Data
UPDATE students
SET gpa = 4.0
WHERE id = 1;
Delete Data
DELETE FROM students WHERE id = 1;
The java.sql Package
JDBC’s power lies in its abstraction through interfaces. The same code can work with different databases by simply changing the driver and connection string.
Key java.sql Interfaces
| Interface | Purpose |
|---|---|
Driver | Database driver implementation |
Connection | Database connection |
Statement | SQL statement execution |
PreparedStatement | Precompiled SQL statements |
ResultSet | Query results |
JDBC Drivers
JDBC drivers implement the JDBC API for specific databases. Adding a new database typically only requires:
- Adding the driver dependency (usually via Maven/Gradle)
- Updating the connection string
MySQL Driver
Add the following dependency to the <dependencies> section of your pom.xml file:
<dependency>
    <groupId>mysql</groupId>
    <artifactId>mysql-connector-java</artifactId>
    <version>8.0.27</version>
</dependency>
PostgreSQL Driver
Add the following dependency to the <dependencies> section of your pom.xml file:
<dependency>
    <groupId>org.postgresql</groupId>
    <artifactId>postgresql</artifactId>
    <version>42.3.1</version>
</dependency>
Part 2: Setting Up Database Servers
We can set up database servers either by downloading and installing their standalone binaries (MySQL Download or PostgreSQL Download) or by running them within Docker containers.
Using Docker for Development
Docker simplifies running databases locally. Get Docker for Desktop. We will set up MySQL and PostgreSQL database servers in Docker containers.
Create a Docker Network
We need to create a network in Docker,so containers can communicate with each other over an isolated network. In your terminal (macOS/Linux) or PowerShell (Windows), run:
docker network create my-network
Running MySQL in a Container
Run MySQL in a container and connect it to the same network. In your terminal (macOS/Linux) or PowerShell (Windows), run:
docker run --name mysql-db --network my-network -e MYSQL_ROOT_PASSWORD=secret -p 3306:3306 -d mysql:8.0
MySQL GUI (Adminer)
We can also run Adminer (a web-based database management tool for MariaDB/MySQL). In your terminal (macOS/Linux) or PowerShell (Windows), run:
docker run --name adminer --network my-network -p 8080:8080 -d adminer
- Open your web browser and go to http://localhost:8080. Login using:
- Server: mysql-db
- Username: root
- Password: secret
Running PostgreSQL in a Container
In your terminal (macOS/Linux) or PowerShell (Windows), run:
docker run --name postgres-db --network my-network -e POSTGRES_PASSWORD=secret -p 5432:5432 -d postgres:17.4
PostgreSQL GUI (pgAdmin)
We can also run pgAdmin (a web-based database management tool for PostgreSQL)
In your terminal (macOS/Linux) or PowerShell (Windows), run:
docker run --name pgadmin \
    --network my-network \
    -e PGADMIN_DEFAULT_EMAIL=example@example.com \
    -e PGADMIN_DEFAULT_PASSWORD=secret \
    -p 5050:80 \
    -d dpage/pgadmin4:9.3
- Open your web browser and go to http://localhost:5050. Login using:
- Email: example@example.com
- Password: secret
- Register the PostgreSQL server. Right click on Servers -> Register -> Server.
- Name: myPostgreServer (or any name)
- Server: mysql-db
- Username: postgres
- Password: secret
- Right click on Databases -> Create > Database…
Part 3: Using Databases in Java
Basic JDBC Workflow
- Create a database and load the JDBC driver
- Establish database connection
- Execute SQL Statements
- Select and Process results
- Close resources properly
3.1 Create a database and load the JDBC driver
Follow the instructions in part 1 and 2 to create a database and add the dependency for database driver to your pom.xml file.
Create a database named studentdb. Create the following table:
Student Table Schema
| Column | Type | Constraints | Description |
|---|---|---|---|
| id | INT | PRIMARY KEY | Student ID |
| name | VARCHAR(100) | NOT NULL | Student’s full name |
| gpa | DECIMAL(3,2) | NOT NULL | Grade Point Average (0.00-5.00) |
| created_at | TIMESTAMP | DEFAULT CURRENT_TIMESTAMP | Record creation time |
MySQL/MariaDB Table Creation
CREATE TABLE students (
    id INT PRIMARY KEY,
    name VARCHAR(100) NOT NULL,
    gpa DECIMAL(3,2) NOT NULL,
    created_at TIMESTAMP DEFAULT CURRENT_TIMESTAMP
);

-- Insert sample data
INSERT INTO students (id, name, gpa) VALUES
    (1, 'Ahmed Ali', 3.75),
    (2, 'Sara Ahmed', 4.50),
    (3, 'Mohammed Omar', 4.65);
PostgreSQL Table Creation
CREATE TABLE students (
    id INTEGER PRIMARY KEY,
    name VARCHAR(100) NOT NULL,
    gpa NUMERIC(3,2) NOT NULL,
    created_at TIMESTAMP DEFAULT CURRENT_TIMESTAMP
);

-- Insert sample data
INSERT INTO students (id, name, gpa) VALUES
    (1, 'Ahmed Ali', 3.75),
    (2, 'Sara Ahmed', 4.50),
    (3, 'Mohammed Omar', 4.65);
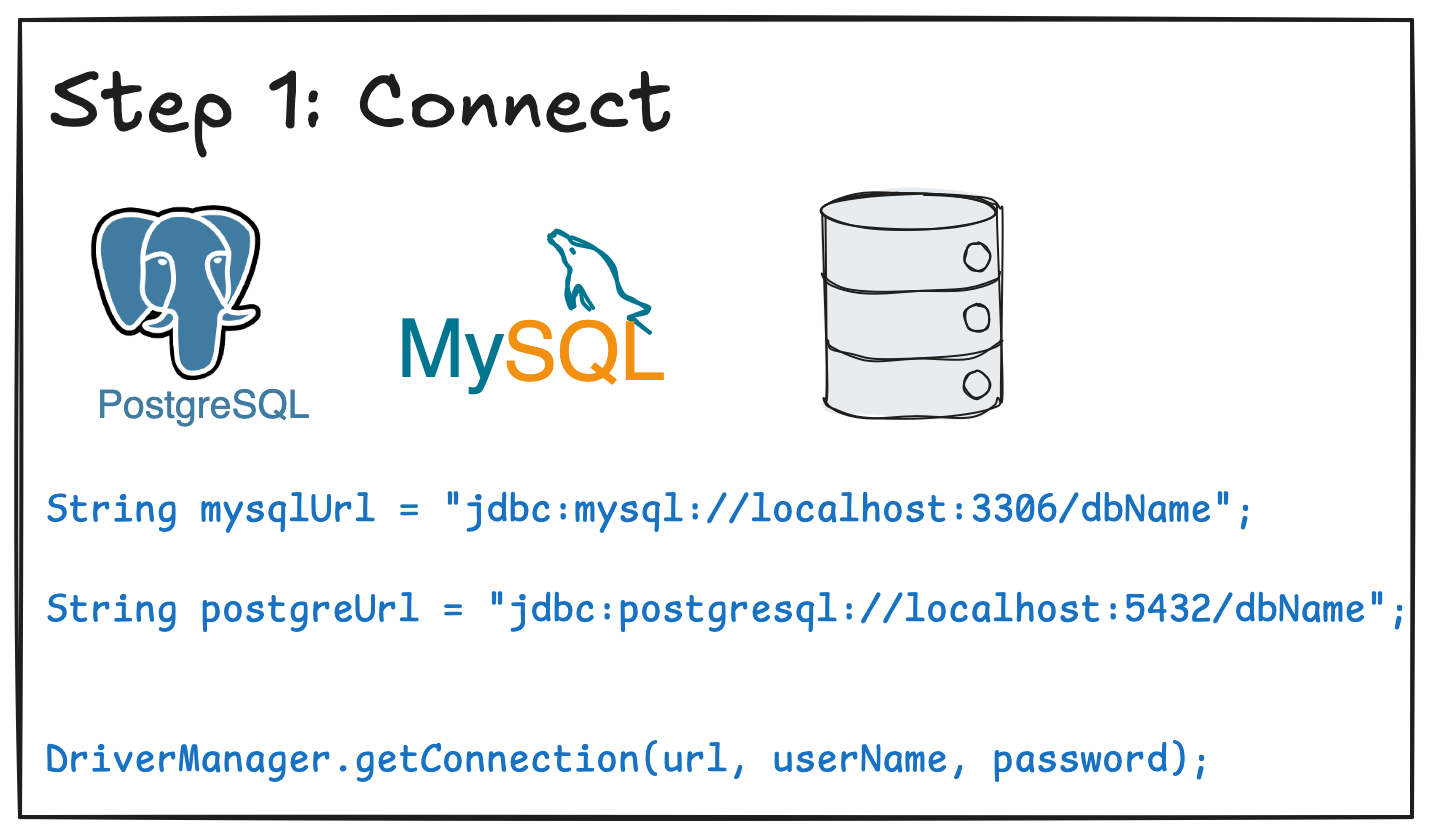
3.2 Establish database connection
3.2.1 Connecting to MySQL server
| |
3.2.2 Connecting to PostgreSQL server
| |
3.3 Execute SQL Statements
JDBC provides three main methods for executing SQL:
executeUpdate(): ForINSERT,UPDATE, andDELETESQL statementsexecuteQuery(): ForSELECTSQL statementsexecute(): For any SQL statement.
3.3.1 Insert
| |
3.4 Select and Process Results
| |
3.5 Close resources properly
You must close the connection when you no longer need it.
Part 4: Prepared Statements
A prepared statement or a parameterized statement is feature in database systems to execute SQL statements with high efficiency and protect against SQL injections.
4.1 What is an SQL injection
SQL injection is a type of security vulnerability that occurs when untrusted data is concatenated with SQL queries. An attacker can inject malicious SQL code into application inputs, which could then be executed by the database server.

4.2 SQL Injection Example
Warning: Unsafe code ⚠️⛔️⚡️
// DON'T DO THIS!
String name = "'; DROP TABLE students; --";
String sql = "SELECT * FROM students WHERE name = '" + name + "'";
This use of string concatenation demonstrates a serious SQL injection vulnerability:
- The code constructs an SQL query by concatenating strings directly with user input (
name) - When executed, the resulting SQL string variable
sqlbecomes:
SELECT * FROM students WHERE name = ''; DROP TABLE students; --'
- This gets interpreted by the database engine as two separate statements:
SELECT * FROM students WHERE name = ''(an empty search)DROP TABLE students(deletes the entire students table!)--'(comments out the rest of the query)
This SQL injection attack works because SQL databases allow multiple statements to be executed in sequence when separated by semicolons. So even if the first statement fails, subsequent statements will still execute and comment markers (
--) can be used to neutralize remaining SQL syntax. This is why directly concatenating user input into SQL strings is extremely dangerous. Always use Prepared Statements instead, which treat the entire input as data rather than executable SQL code.
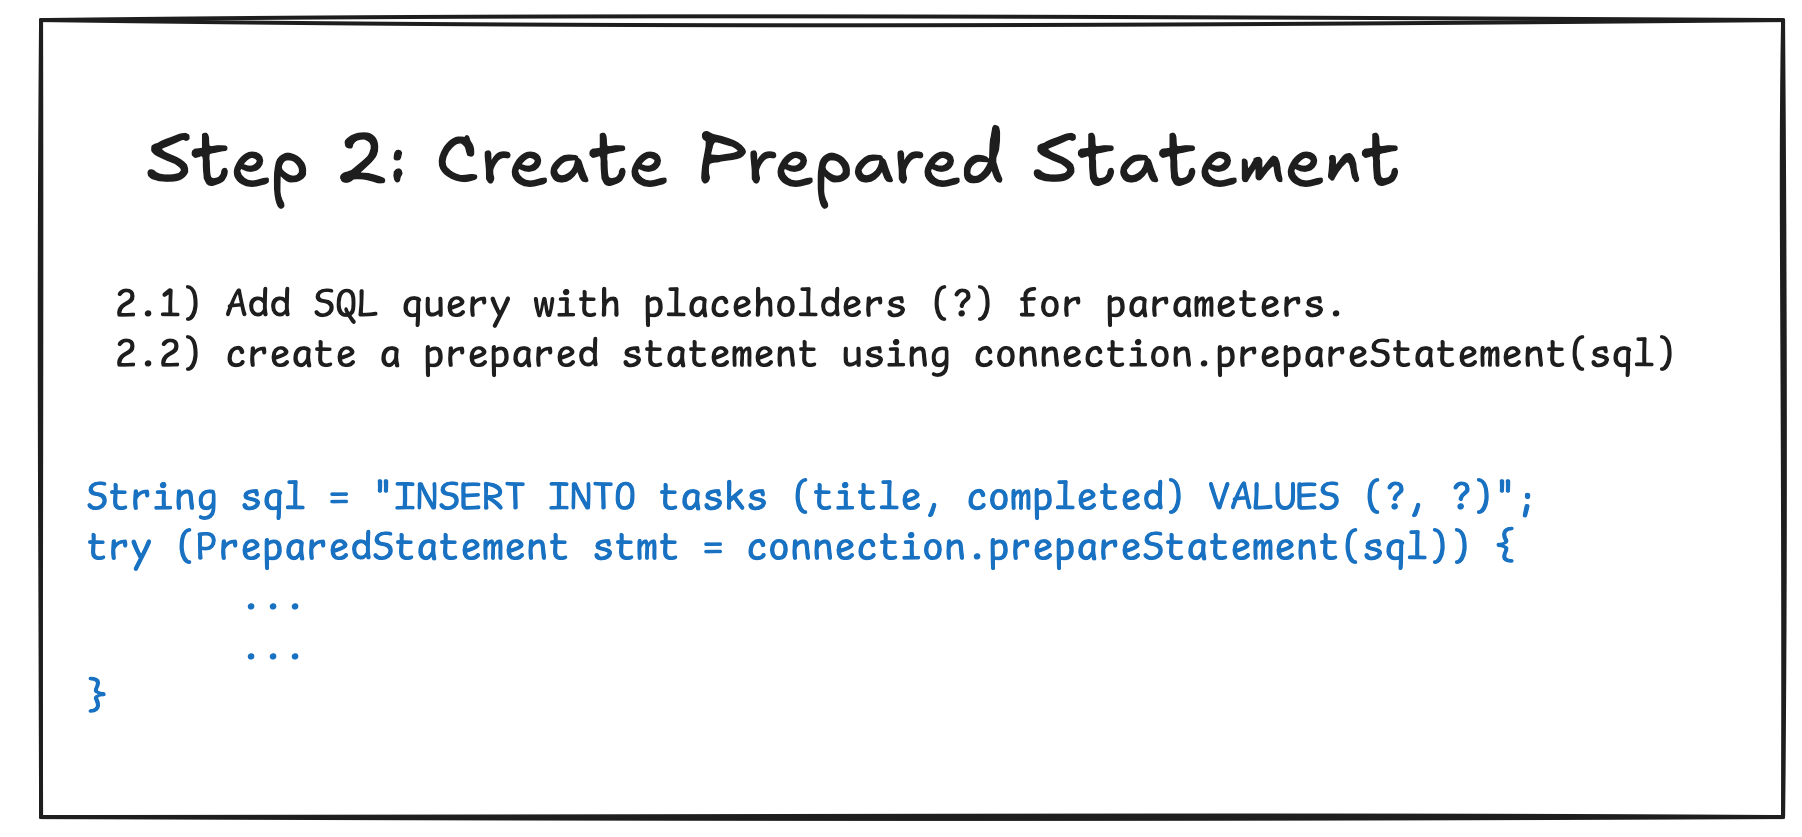
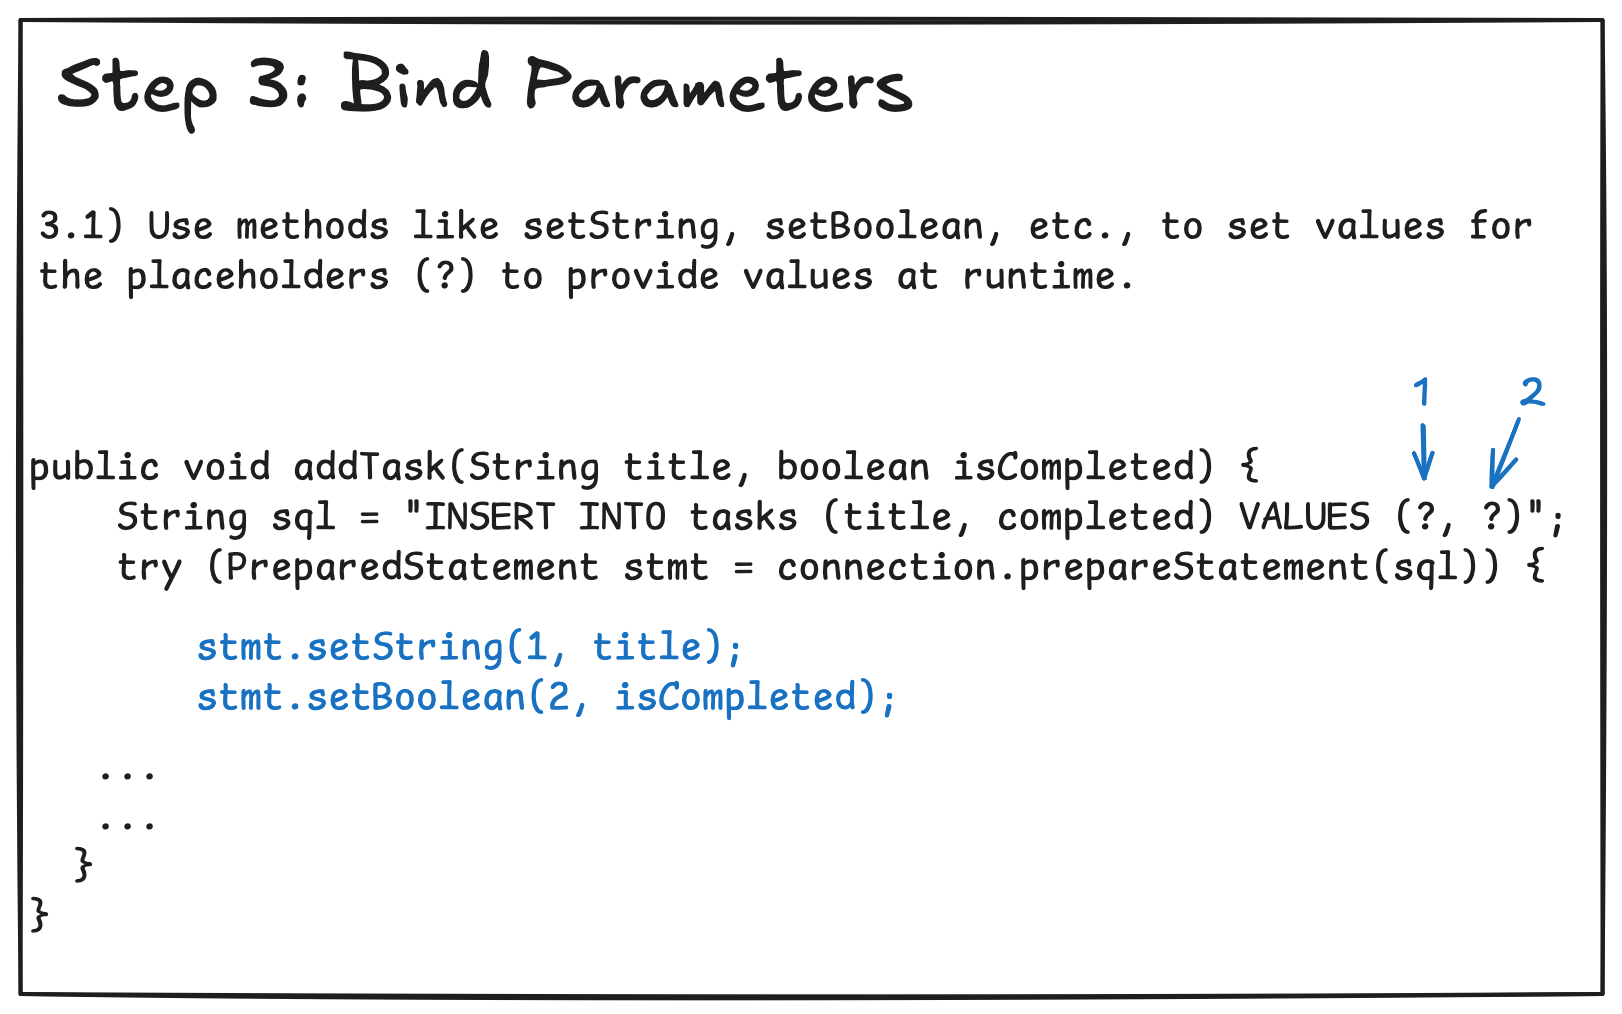
4.3 Creating and Using Prepared Statements

Part 5: Example CRUD Application in MySQL and PostgreSQL
Let’s create a simple Todo List application built with Java and MySQL/MariaDB. The application uses a MariaDB database for storing tasks and performs CRUD operations. CRUD stands for Create, Read, Update, and Delete. It allows users to add, list, mark as complete, and delete tasks.
5.1 MySQL Example
Step 1: Download Docker
Download and install Docker from the official website.
Step 2: Clone the project
Clone the project at https://gitlab.com/cpit305/code-examples/-/tree/main/database-examples/mariaDB-example
Step 3: Open the project in your IDE
Open the project in IntelliJ IDEA.
Step 4: Run docker-compose up
Open PowerShell or the Terminal app and navigate to the project directory and run the following command to start the MariaDB and Adminer services:
docker-compose up
This will start the MariaDB database and Adminer (a web-based database management tool for MariaDB/MySQL).
Step 5: Log into Adminer
- Open your browser and go to
http://localhost:8080. - Use the credentials defined in the
.envfile to log into the database server:- Server:
db- If you do not want to use Docker and prefer to install and run it locally, then use
localhostinstead ofdb.
- If you do not want to use Docker and prefer to install and run it locally, then use
- Username:
root - Password:
changeme
- Server:
Step 6: Create the Database
- After logging into Adminer, click on the SQL Command link.
- Make sure the Database tododb is selected in the dropdown.
- Paste the following SQL code for creating the required tables and click Execute.
CREATE TABLE IF NOT EXISTS tasks (
    id INT AUTO_INCREMENT PRIMARY KEY,
    title VARCHAR(255) NOT NULL,
    completed BOOLEAN DEFAULT FALSE,
    created_at TIMESTAMP DEFAULT CURRENT_TIMESTAMP
);
Table Schema
The following table represents our tasks:
| Column | Type | Constraints | Description |
|---|---|---|---|
| id | INT | AUTO_INCREMENT, PRIMARY KEY | Unique identifier |
| title | VARCHAR(255) | NOT NULL | Task title |
| completed | BOOLEAN | DEFAULT FALSE | Task completion status |
| created_at | TIMESTAMP | DEFAULT CURRENT_TIMESTAMP | Creation timestamp |
Step 7: Download the MySQL database driver
- Open the project in your IDE and open the
pom.xmlfile. - Add the maven dependency for the MySQL Connector/J driver in your
pom.xmlfile:
    <dependency>
      <groupId>mysql</groupId>
      <artifactId>mysql-connector-java</artifactId>
      <version>8.0.33</version>
    </dependency>
Step 8: Run the Main Class
- Open the DatabaseConnection class at
src/main/java/sa/edu/kau/fcit/cpit305/DatabaseConnection.javaand make sure the database credentials match those in . If not, update them accordingly. - Run the main class
Appatsrc/main/java/sa/edu/kau/fcit/cpit305/App.java. - You will be prompted to select an option:
=== Todo List Application ===
1. Add new task
2. List all tasks
3. Mark task as complete
4. Delete task
5. Exit
Choose an option:
- Enter the number corresponding to the action you want to perform and follow the prompts.
- Run the accompanying tests to ensure everything is working correctly.
5.2 PostgreSQL Example
Please refer to the PostgreSQL implementation example available at the following git repository: https://gitlab.com/cpit305/code-examples/-/tree/main/database-examples/postgreSQL-example).
Conclusion
JDBC provides a powerful and flexible way to work with databases in Java applications. Its interface-based design allows for database independence, while features like PreparedStatements ensure secure and efficient database operations. When developing database applications in Java, you should keep the following best practices in mind:
- Always use PreparedStatements for executing SQL statements.
- Close resources using try-with-resources
- Handle SQLExceptions appropriately