Java Networking
Java’s networking capabilities are primarily provided through the java.net package, which offers classes for implementing network communications, managing network resources, and handling various networking protocols.
Socket Programming in Java
A network socket is a software component within a computer network that acts as a communication point for transmitting and receiving data between nodes (devices).
Socket programming is the foundation of network communication between nodes.
Sockets support full-duplex communication, which means they allow bidirectional data transfer. This means that data can be sent and received simultaneously over the same connection.
In the context of computer networks, we need to define a few key terms:
- Node: Any device or endpoint that is connected to the network and can send and receive data. Examples include computers, smartphones, routers, switches, and IoT devices.
- Host: A host is any node connected to a network. It’s identified by an IP address or domain name. It is like a phone number that identifies a specific node on the network (like how a phone number identifies a specific building or office).
- Port A port is a communication endpoint that allows applications to communicate over a network. It is like an extension number. It identifies a specific service or application running on that computer (like how an extension number reaches a specific office or department).
- Server: A software program that runs on a host machine and listens for incoming requests on a specific port. It handles these requests and sends back the responses to clients.
- localhost: It refers to the local computer or node that a program is running on. It is a hostname that resolves to the loopback IP address, which is
127.0.0.1for IPv4 and::1for IPv6. - Private IP Addresses: Private IP addresses that are not routable on the public internet and are used for internal communication within the network. The t following IPv4 address ranges for private networks:
10.0.0.0–10.255.255.255,172.16.0.0–172.31.255.255, and192.168.0.0–192.168.255.255. - Public IP addresses: Public IP addresses are globally unique and routable on the public internet. They are assigned by the Internet Service Providers (ISPs) and are used to identify nodes on the internet.
Types of Sockets in Java:
In Java, the package java.net provides the classes for implementing networking applications. There are two types of sockets:
- Server Socket: Waits for client requests to come in over the network. In Java, the class
ServerSocket - Client Socket: Initiates connection to server
We use a host name and a port number together to uniquely define the destination of network communication on a node.

Example 1: Echo Server-Client
Echo Server
We will create a TCP socket server that echoes back any message received from clients. We will use standard Java I/O classes (BufferedReader and PrintWriter) for character/text based network communication.
EchoServer.java
| |
Echo Client
The corresponding client that sends messages to the server:
EchoClient.java
| |
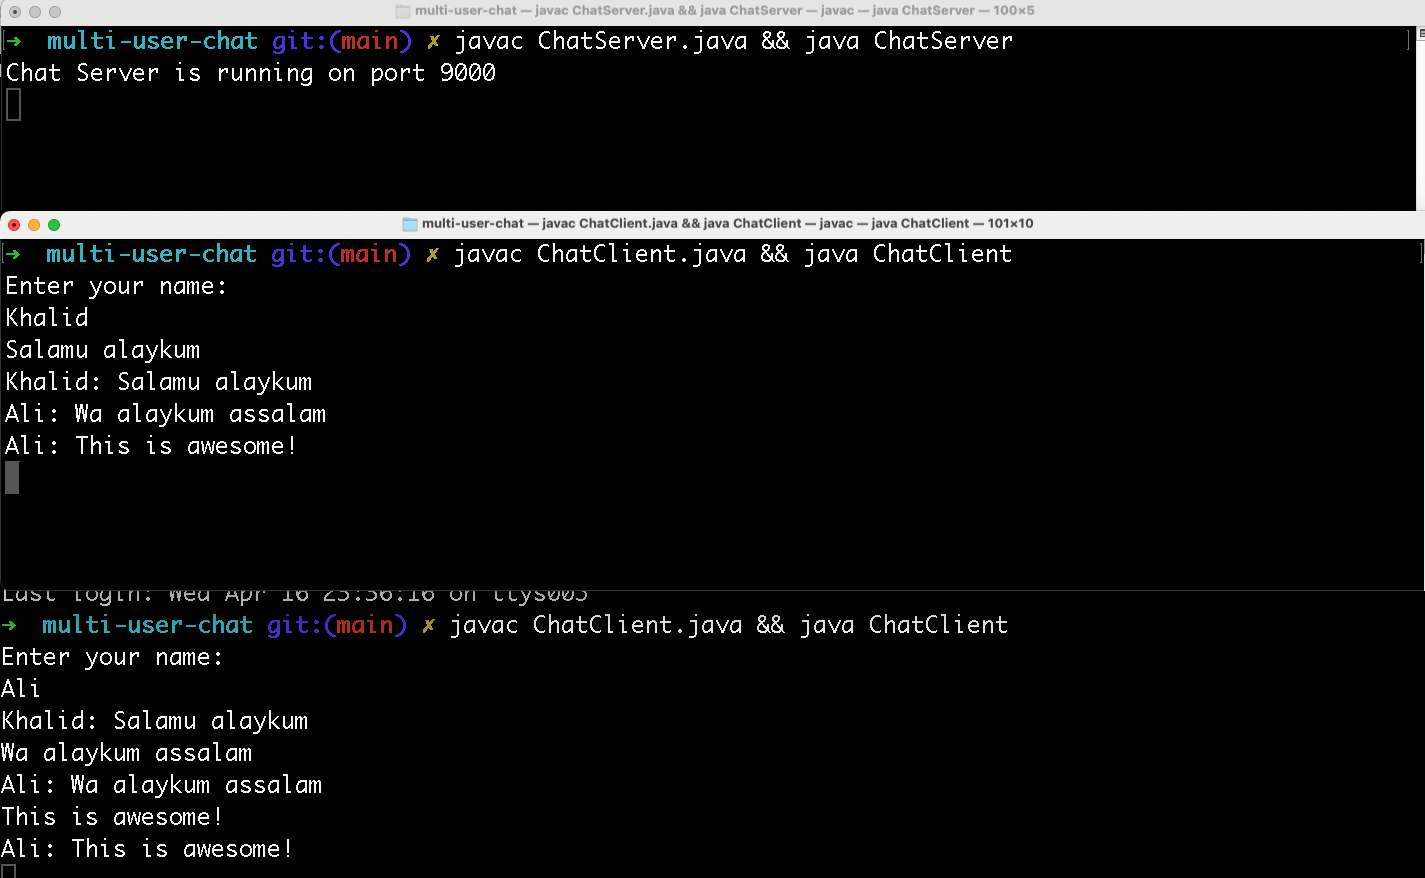
Example 2: Multi-User Chat Server using Multithreading
We will build a more complex example of a chat server that can handle multiple clients simultaneously using multithreading. Each client connection is handled in a separate thread to allow the server to accept multiple concurrent connections. When a client connects, a new ClientHandler thread is created to handle the client’s communication.
Chat Server
ChatServer.java
| |
Chat Client
graph LR
    subgraph Client
        RT[Reader Thread]
        MT[Main Thread]
    end
    subgraph Server
        S[Server]
    end
    RT <--> S
    MT <--> S
The ChatClient uses threads for full-duplex communication. A reader thread will continuously read incoming messages from server and print them to the console. The main thread will handle user input and send messages to the server.
ChatClient.java
| |
Run the server and at least two clients
Open at least three tabs/windows of your terminal (Powershell or Terminal) and compile and run the server and clients in a new tab or window.
Accessing Chat Service via Telnet
The chat server operates at the Transport Layer (Layer 4) of the OSI model, using raw TCP sockets rather than an application-level protocol. This means you can connect to it using any TCP client, including Telnet. It sends plain text directly over TCP and doesn’t implement any specific application protocol.
Using Telnet to Connect
Telnet is a network protocol that provides a bidirectional text-based communication channel between two terminal-oriented processes like TCP sockets. It works with our chat server because both telnet and our server use raw TCP connections and exchange plain text messages with line endings.
- Download and install telnet
- On Windows:
- Open Control Panel
- Go to Programs and Features
- Click “Turn Windows features on or off”
- Check the box next to “Telnet Client”
- Click OK and wait for installation
- On macOS:
- Start the chat server
- Open PowerShell, or the Terminal and connect using telnet:
| |
- Type messages and press Enter to send
- Messages appear as plain text on the connected clients.
Testing Multiple Connections
Open multiple Powershell/Terminal windows to simulate different users:
Each terminal session represents a different chat partusericipant.
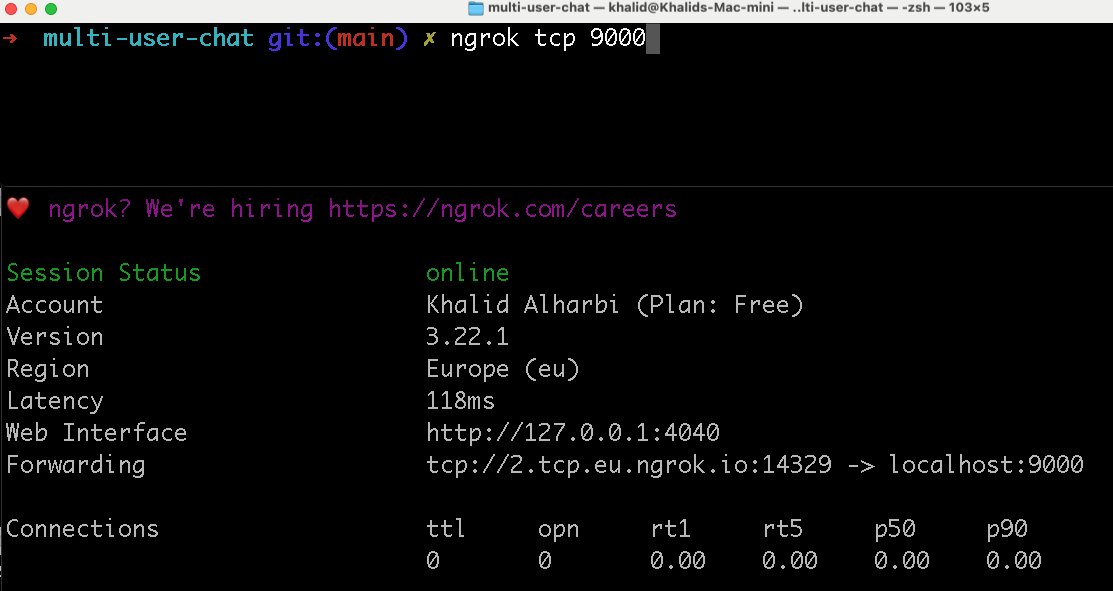
Making Your Chat Server Public with ngrok
ngrok creates secure tunnels to localhost, allowing others to access your chat server over the internet.
ngrock establishes a secure tunnel that connects your computer to the internet. When you run a socket server on your computer (localhost), only you can access it from the public Internet. ngrok creates a secure/encrypted connection between the public endpoint and your local machine. It generates a special link that lets anyone on the internet connect to your socket server without assigning a public IP address for your actual computer. ngrock will then forward the requests to your socket server.
For example:
- Your chat server runs on:
localhost:9000(only you can access it on your computer) - ngrok creates:
tcp://2.tcp.ngrok.io:19842(anyone can access on the Internet)
- Install ngrok
- Sign up for a free account on ngrok with GitHub.
- Download and install ngrok
- Windows: Download a standalone executable.
- macOS: Download a standalone executable or install it using Homebrew:
brew install ngrok.
- Follow the installation instructions to configure it:
| |
- Start your chat server on port 9000
- Create tunnel with ngrok:
| |
- ngrok displays a forwarding address like:
Forwarding tcp://2.tcp.ngrok.io:19842 -> localhost:9000
Copy the address. Now anyone can connect to your chat server using teh generated domain and port number:
| |
Connect using a different computer or smart phone
To connect from mobile devices, you need a telnet client. Most Secure Shell (SSH) clients support telnet.
Android
- You may install ConnectBot, JuiceSSH, or Termius from the Google Play Store.
- Create a new connection:
- Host: Your ngrok address (e.g.,
2.tcp.ngrok.io) - Port: Your ngrok port (e.g.,
19842) - Type: Telnet
- Host: Your ngrok address (e.g.,
- Connect and start sending messages to the multi-user Java Socket chat system
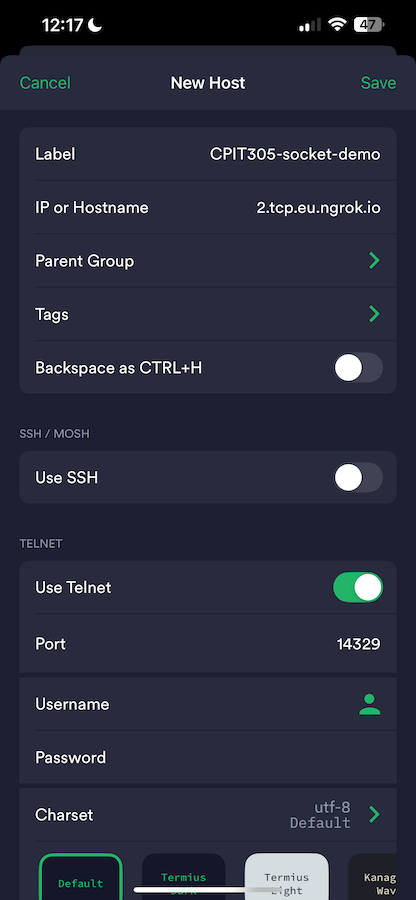
iPhone/iPad
- Install Termius or iTerminal from App Store.
- Add new host:
- Host: Your ngrok address
- Port: Your ngrok port
- Connect using: Telnet
- Tap connect to join the chat TCP socket
Note: The ngrok URL changes each time you restart ngrok, so you’ll need to update the connection details on your mobile devices accordingly.
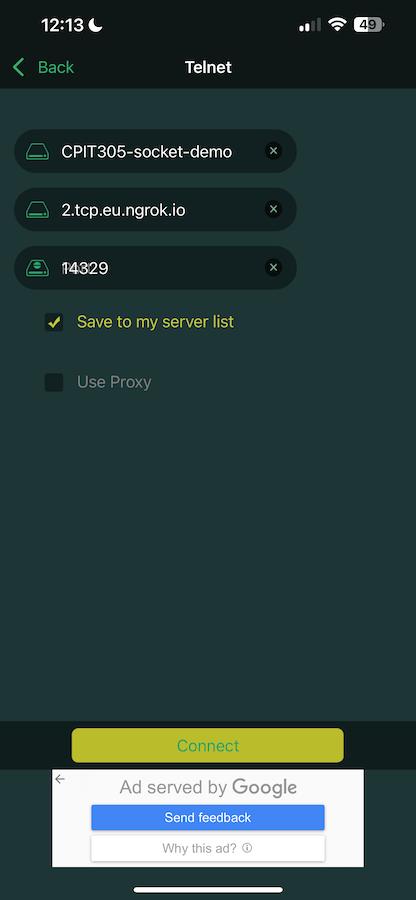
Telnet via iTerminal app
Telnet via Termius app
Socket Timeouts
Socket timeouts are crucial for preventing indefinite blocking operations. Java provides two types of timeouts:
- Connection Timeout: Maximum time to wait for connection establishment
- Read Timeout: Maximum time to wait for data to be received
Example: Socket Timeouts:
| |
URLs and Exceptions
Java provides the URL class for working with URLs and several exceptions for handling network-related errors:
Common Networking Exceptions:
UnknownHostException: Host name cannot be resolvedConnectException: Connection refusedSocketTimeoutException: Operation timed outSocketException: General socket errorMalformedURLException: Invalid URL format
URL Example:
| |
URLConnection vs HttpClient
URLConnection (Legacy API)
- Part of original Java networking API
- More verbose and less features
- Synchronous only
- Still supported but not recommended for new code
URLConnection Example:
| |
HttpClient (Modern API)
- Introduced in Java 11
- Support for HTTP/2
- Synchronous and asynchronous operations
- Better API design
- Support for websockets
- Recommended for new code
HttpClient Example
Below is an example on how to fetch data from the Wikipedia API.
| |
Which One to Use HttpClient or URLConnection?
- Use
HttpClientif:- You’re starting a new project
- You need HTTP/2 support
- You need async operations
- You want a modern, well-designed API
- Use
URLConnectionif:- You must maintain legacy code
- You need to support very old Java versions
- You have specific requirements tied to
URLConnection
The HttpClient API is the modern, recommended way to make HTTP requests in Java. It provides a more robust, feature-rich, and developer-friendly interface compared to the older URLConnection API.